Thursday, November 13, 2014
13 8V 20A DC Power Supply
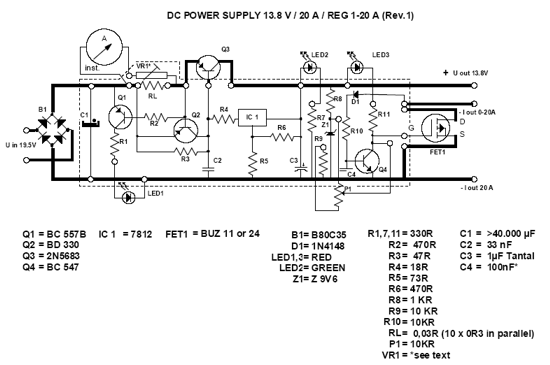
The following DC Power supply circuit is a linear power supply (using transformer). The voltage output of 13.8V power supply is highly regulated, can be adjusted in the moderate range, at up to 20A continuous current. This power supply is suitable for use for amateur radio equipment. DC Power supply is easily constructed and suitable for heavy duty because it is very efficient, small and lightweight.
In the DC power supply presented here, the pass transistors are located in the negative rail and connected in common-emitter configuration rather than as emitter-followers. Thanks to this, the regulator’s minimum voltage drop is extremely low, only about 0.1V for the transistors plus 0.5V for the equalizing resistors.
DC Power Supply Circuit
The other advantage is that the collectors are directly connected to the negative pole of the power supply’s output, which in most applications is grounded. That means that no insulation is required between the transistors and the grounded power supply cabinet! This eases the cooling very considerably. Thanks to the low regulator drop, a low cost 25V filter capacitor can be used.
Some Notes of DC Power Supply Circuit
- Use a transformer for the primary voltage you need. The 3A fuse is for 220 or 240V primaries. If you use something in the neighborhood of 110V, use a 6A fuse.
- The rather high transformer rating of 35A accounts for the losses that occur due to the capacitive input filter. If your transformer is rated for capacitive input, then a 25A value is enough.
- Of course you can make up C1 by placing several smaller capacitors in parallel. Likewise, the 0.1 Ohm, 5 Watt resistors can be made up by several in parallel, for example by 5 resistors of 0.5 Ohm, 1 Watt each.
- The LM336Z-5.0 voltage reference IC should not be replaced by a zener diode. Zeners are not nearly as stable. A different voltage reference IC can of course be used, if R2 and R3 are modified for the different voltage.
- D1 and Q2 through Q6 need heatsinking. Only Q2 needs insulation. D1 dissipates up to 60W, Q2 up to 25W, while the pass transistors dissipate up to 30W each in normal use, but may reach a level of 130W during short circuit! Take this into account when choosing the heat sink!
- R5 exists only to make sure that the transistors can actually be driven off. The 741 is not a single-supply operational amplifier, so it cannot drive its output very low. If a true single-supply opamp is used, then R5 becomes unnecessary.
Monday, October 13, 2014
7812 2N3055 13 8V 10A Regulator diagram
The power supply circuit is shown in Figures 1 and 2. A 7812 positive 3-terminal regulator is used for the main 13.8V 10A regulator, and this is followed by as many power emitter followers as needed for the current you require. The transistors are not critical. I used 2N3771 devices (50V, 20A, 200W) simply because I had a whole bunch of them in my junk-box. These are pretty much ideal, but I suggest that you use whatever you can get cheaply. If you use 2N3055s (as indicated in the schematic), expect to use four transistors for the first 10A, and one transistor for each additional 5A peak (or 4A continuous) output capability to ensure an adequate safety margin. The voltage rating is unimportant, as the main supply will only be about 22V with an 18V transformer.
As you can see, the regulator is made adjustable over a small range, and will typically give from 11V to 13.8V at full load. With the no-load voltage set to 13.8V (nominal 12V battery voltage), the output will fall to 13.5V at about 1.5A, and 12.8V at around 13A. This is fairly typical of the voltage drops that can be expected in a car installation. Needless to say, if the supply is designed for more current, then the regulation will remain about the same, but at the higher design currents.
Sunday, October 5, 2014
10 Amp 13 8 Volt Power Supply
10 Amp 13.8 Volt Power Supply Parts List :
R1 1.5K ¼ Watt Resistor (optional, tie pins 6 & 5 of IC1 together if not used.)
R2,R3 0.1 Ohm 10 Watt Resistor (Tech America 900-1002)
R4 270 Ohm ¼ Watt Resistor
R5 680 Ohm ¼ Watt Resistor
R6,R7 0.15 Ohm 10 Watt Resistor (Tech America 900-1006)
R8 2.7K ¼ Watt Resistor
R9 1K Trimmer Potentiometer (RS271-280)
R10 3.3K ¼ Watt Resistor
C1,C2,C3,C4 4700 Microfarad Electrolytic Capacitor 35 Volt (observe polarity)
C5 100 Picofarad Ceramic Disk Capacitor
C6 1000 Microfarad Electrolytic Capacitor 25 Volt (observe polarity)
IC1 LM723 (RS276-1740) Voltage Regulator IC. Socket is recommended.
Q1 TIP3055T (RS276-2020) NPN Transistor (TO-220 Heat Sink Required)
Q2,Q3 2N3055 (RS276-2041) NPN Transistor (Large TO-3 Heat Sink Required)
S1 Any SPST Toggle Switch
F1 3 Amp Fast Blow Fuse
D1-D4 Full Wave Bridge Rectifier (RS276-1185)
T1 18 Volt, 10 Amp Transformer Hammond #165S18 (Digi-Key HM538-ND)
